
Delicious Audio Software and Plug-ins
Internet Radio Broadcasting
Internet radio broadcast encoder.
Deliver streaming audio over the web.
Streaming audio cloud platform.
Music Production
Audio editor and sample slicer.
Legacy Music Production and VST Plug-ins
Organic music sketchpad.
Classic mellow synthesizer.
Raw analog synth samples.
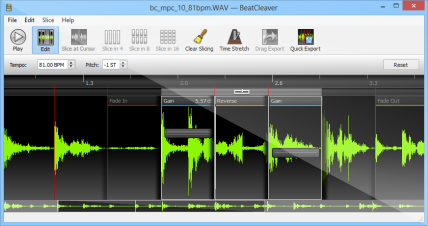
This tutorial explains how to cut up audio files with BeatCleaver. If you need to cut an audio file into different sections and split up, this article will show you how to do it. We've also thrown in some tips for advanced users at the bottom of the page!
BeatCleaver is software designed to make it very easy to cut, split, and trim audio files. It can open MP3, M4A, FLAC, and WAV files (plus WMA on Windows), and it will split those into separate WAV files for you to preserve quality. BeatCleaver revolves around the idea of "slice points", represented by red lines showing where the audio will be split. When you want to chop audio in BeatCleaver, you first insert slice points, then export the slices all at once.
Let's start at the beginning and see how to cut audio files:

To open an audio file in BeatCleaver, drag it from a folder and drop it on the BeatCleaver window, or in the menu, select "File->Open..."
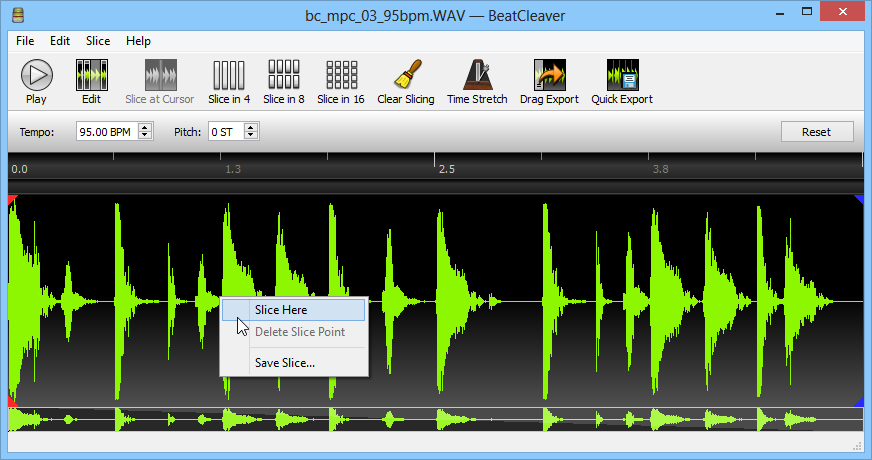
If you want to cut the audio manually, you can right-click on a place in the waveform and select "Slice Here". A slice point will be inserted where ever you right-clicked.
Alternatively, hold the Shift key on your keyboard and left-click on the waveform to insert a slice point. This can be a faster approach if you need to split a file in many places.

You can split the audio file into equal sections by using the Slice in 4, Slice in 8, and Slice in 16 buttons on the toolbar. Try clicking one of those now. You can undo this via the menu by clicking "Edit->Undo".
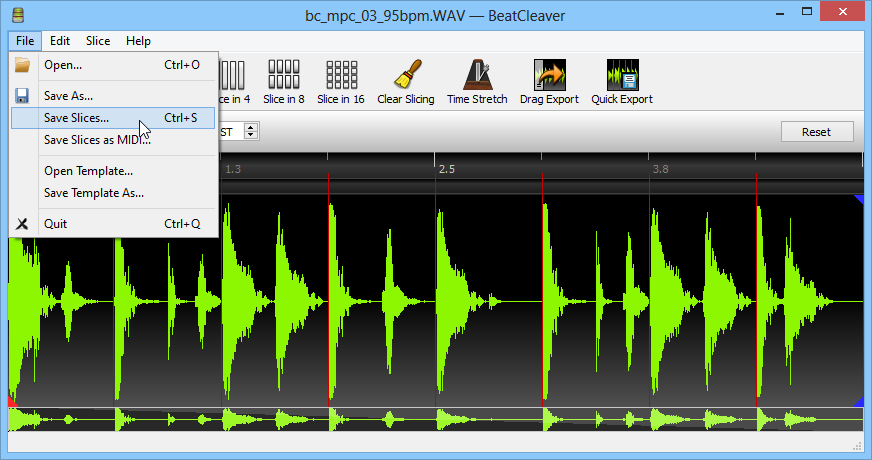
To export your slices, select "File->Save Slices...", and pick a directory to save the slices to. BeatCleaver will then split your audio file at the slice points, saving each slice to a separate WAV file.
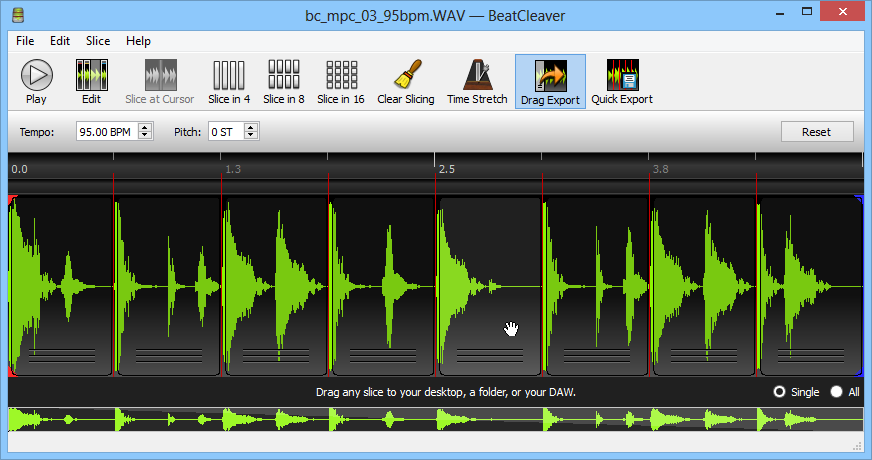
Check the tips below for other ways you can export your slices, including how you can drag slices right out of BeatCleaver.
That's it! Your audio file is now cut or split, and the slices are now saved to your hard disk. This tutorial covered how to split or cut audio in BeatCleaver, and how to save the resulting slices to disk. These slices are saved in the WAV format, which is universally compatible with other audio software, so you can import them into a DAW or play them with any other audio software. Read on for more tips on how to slice audio with BeatCleaver.
We hope this tutorial was helpful, but if you need extra help or have suggestions on how we can improve this tutorial, please let us know!
BeatCleaver is a sampling audio editor and beat slicer for sampling songs, recordings, and beats.
Chop, time-stretch, repitch, and edit all your samples and sounds. With fluid waveform editing and drag export, BeatCleaver makes the sampling workflow quicker and simpler.
Find out more about BeatCleaver!
Features at a Glance:
Try it today:
Ready to chop?


![]()
Copyright © Radio Mast, Inc. 2011 - 2024
VST is a trademark of Steinberg Media Technologies GmbH
